Nameservers decide who is in charge of your domain’s DNS zone and assign IP addresses to domain names. If you change web hosts, your site will only work after you point the name.
This guide will show you how to change a domain’s nameservers so that it points to a different web host. You can then move your page to a different host and still keep the old domain name.
- Access Your Domain Registrar Account: Log in to the website of your domain registrar.
- Navigate to DNS Settings: Locate the section for DNS management or settings.
- Find the Nameserver Settings: Look for the option to update or change your domain’s nameservers.
- Enter New Nameserver Details: Input the new nameserver information given by your web host or DNS provider.
- Save and Wait for Propagation: Save the changes and allow some time for the DNS updates to propagate across the internet.
Keep in mind that the way you change nameservers may be different based on the company that registered your domain. We’ll show you how to do things at different sources.
Why Should a Domain Change Its Nameservers?
One big reason people change their nameservers is when they switch hosting providers.
If you just changed your site to a new hosting company, for instance, the domain name might still be linked to the old hosting company and won’t take people to your new site.
To connect your domain name to a new web host, you have a few strategic options:
- Change Nameservers: This is the preferred method. By changing your domain’s nameservers, you shift control of your domain’s DNS settings to your new hosting provider, while keeping the current registrar unchanged.
- Transfer Domain: Consider transferring your domain to the new host if you prefer managing all services in one location. Be aware that transferring a domain often incurs additional fees because it usually extends the domain registration for an additional year. Costs can vary depending on the top-level domain (TLD) but typically hover around $15.
- Update the DNS A Record: Although updating the A record might seem straightforward, it’s less advisable because it only updates the A record itself. Other essential records, like MX or TXT, will not automatically update to reflect the new hosting environment, potentially leading to service disruptions.
For further insights into domain management, including how to identify the owner of a domain, it’s beneficial to explore domain registration details further.
How to Change Nameservers with Your Provider
To update your domain’s nameservers efficiently, follow these simplified steps:
Obtain New Nameservers:
- Retrieve the list of new nameservers from your hosting provider’s documentation or your post-purchase email. If you encounter any difficulties, contact your host’s customer support for assistance.

Apply the New Nameservers:
- Log into your domain registrar’s website, where you originally purchased your domain.
- Navigate to the Domain Management or Overview section and select the option to manage or edit nameservers.
- Remove any existing nameservers listed and replace them with the new ones provided by your host. Ensure that nameserver details (like ns1, ns2) are entered in the corresponding fields.
2. If your host provides more nameservers than your registrar has fields for, just use the first two.
3. For detailed guidance, refer to your hosting provider’s specific nameserver management instructions or consult their support team.
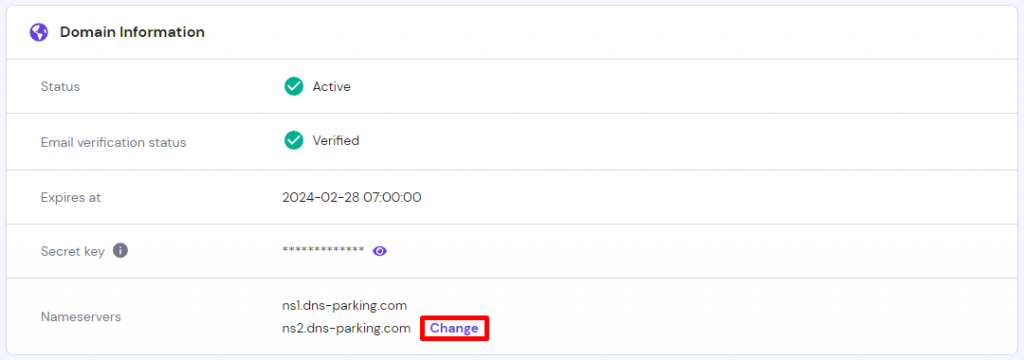
Changing Nameservers in Hostinger
To update the NS records in Hostinger, follow these streamlined steps:
1. Access Your Domain Settings:
- Navigate to the Domains section and select your specific domain.

2. Manage Nameservers:
- Click the Change button to reach the nameservers management page.

Update Nameservers:
- Select the option to change nameservers, input the new details, and click Save to apply the changes.

Changing Nameservers in GoDaddy
To update nameservers at GoDaddy, follow these straightforward steps:
Access Domain Settings:
- Click on the My Account icon, then select the Domains quick link.

Navigate to DNS Management:
- From the My Domains page, choose Manage DNS.

Adjust Nameservers:
- Select the domain you wish to manage, scroll to the Nameservers section, and click Change.
- Opt for the Enter my own nameservers (advanced) option, input the new nameservers, and click Save to finalize the changes.

Changing Nameservers in Namecheap
To update nameservers in Namecheap, here’s a quick guide:
Open Domain Management:
- Navigate to the Domain List section and click Manage next to your desired domain.

Set Custom DNS:
- In the Nameservers section, choose the Custom DNS option, enter the new nameservers, and then save your changes to apply them.

What to Do After Updating Nameservers?
After updating your nameservers, the changes need to propagate globally, a process that can take up to 24 hours. This DNS propagation is automatic.
To monitor the progress of DNS propagation, use tools like DNS Checker. Simply enter your domain, select ‘NS’ for the DNS record type, and initiate a search to see the status.

Most places should be able to see the new addresses. If some places still don’t show the new addresses after 24 hours, try clearing the DNS cache.
Conclusion
Changing nameservers is a critical task when switching to a new hosting provider to redirect your domain. Here’s a brief recap of the essential steps:
- Acquire the New Nameserver Details: Obtain these from your new hosting provider.
- Update Nameservers at Your Registrar: Implement the changes via your domain registrar’s control panel.
- Allow Time for Propagation: Wait for global DNS propagation to complete, typically up to 24 hours, until your site becomes accessible again.
We hope this guide has been helpful. For further assistance or questions, please leave a comment below.


